Off Hand Parry 2
From Scholar Victoria
(Difference between revisions)
(Created page with "Parry from high guard using the off hand. Canonically these are performed from reverse grip, but variations can be extrapolated from the orthodox grip. [[File:DaggerOffHandP...") |
|||
| (3 intermediate revisions by one user not shown) | |||
| Line 3: | Line 3: | ||
Canonically these are performed from reverse grip, but variations can be extrapolated from the orthodox grip. | Canonically these are performed from reverse grip, but variations can be extrapolated from the orthodox grip. | ||
| − | [[File: | + | [[File:DaggerOffHandParry2.png | center]] |
{| class="wikitable" style="margin-left: auto; margin-right: auto; border: none;" | {| class="wikitable" style="margin-left: auto; margin-right: auto; border: none;" | ||
| Line 10: | Line 10: | ||
! Lehrling | ! Lehrling | ||
|- | |- | ||
| − | | [[Oberhut]], | + | | [[Oberhut]], left leg forward |
| − | | [[Mittelhut]], right leg forward | + | | [[Mittelhut]]/[[Kreutzhut]], right leg forward |
|- | |- | ||
| − | | [[ | + | | [[Passing Step]] stab from the right to their upper openings. |
| − | | Catch their wrist with your left hand | + | | Catch their wrist with your left hand or crossed hands. |
|- | |- | ||
| | | | ||
| − | | [[ | + | | [[Gathering Step]] through behind his right leg, slide the right arm up beneath their upper arm, grasping it so as to achieve our outside/reverse figure 4 lock position. |
|- | |- | ||
| | | | ||
| Break the arm/throw. | | Break the arm/throw. | ||
|} | |} | ||
Latest revision as of 05:32, 15 October 2019
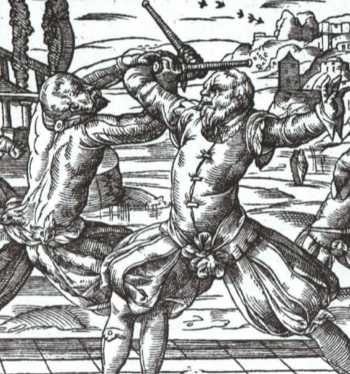
Parry from high guard using the off hand.
Canonically these are performed from reverse grip, but variations can be extrapolated from the orthodox grip.
| Meister | Lehrling |
|---|---|
| Oberhut, left leg forward | Mittelhut/Kreutzhut, right leg forward |
| Passing Step stab from the right to their upper openings. | Catch their wrist with your left hand or crossed hands. |
| Gathering Step through behind his right leg, slide the right arm up beneath their upper arm, grasping it so as to achieve our outside/reverse figure 4 lock position. | |
| Break the arm/throw. |
